Thursday, March 12, 2015

Campground Showers Made Easy!

So many of you campers out there know the hassle of trying to pack shampoo, conditioner and soap to take to the showers when camping. And if more than one want to go at the same time you need double the number of bottles etc. Or you simply can't. Storage in our trailers etc is prime real estate. So I saw this on pinterest and really wanted one. Actually 3 would work best for us as we have many people in our house. We just bought a new trailer and I'm already collecting the little things that take clutter to the minimum and life easy. So I started hunting. Found this exact product on a US site that....You guessed it....only to a US address. Crud!

 
So began the search. Really all I need is the bottles, or something similar that can be attached to the lanyard and take a bit of a beating. I started was frustrated at what I was finding on the web and brainstormed if I could make my own. But really in the end I couldn't come up with something that would work. But then I stumbled on these.
 
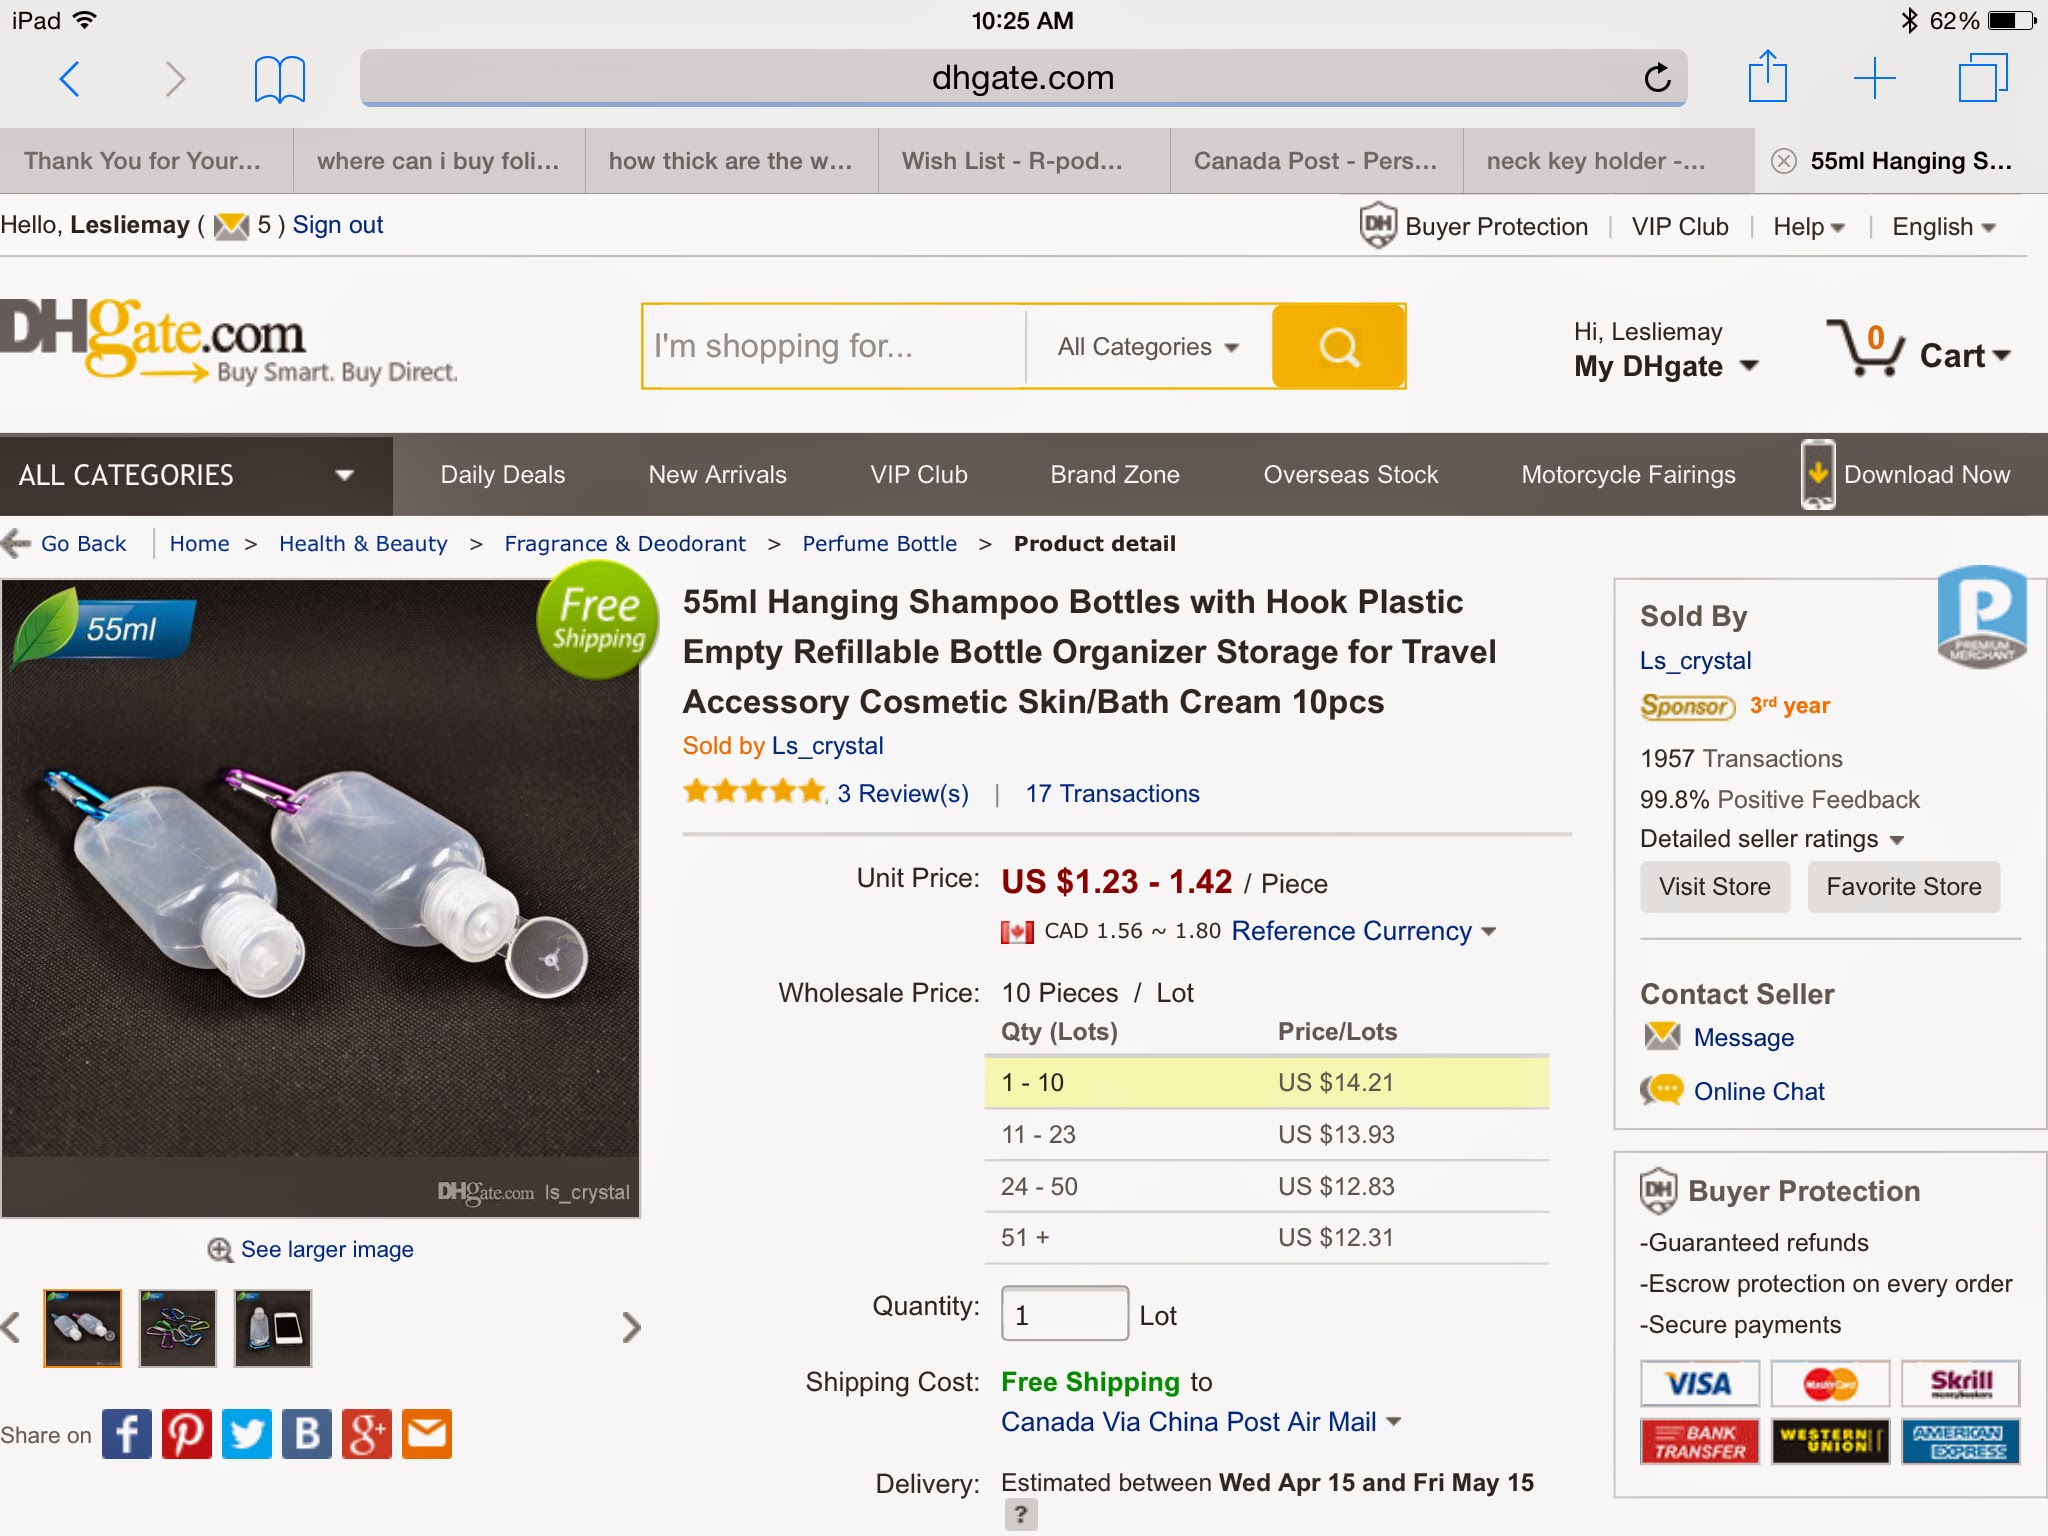
yes they ship to canada. Only downfall is they come in quantities of 10. I bought 20 total because I can thing of several people who would like one for themselve and they would make a great gift. I need 9 bottles just to do my family and the price is certainly doable.
Happy Camping.


Wednesday, February 25, 2015

Master Bedroom Make Over Complete - For Now Anyway

So I began this blog with my master bedroom make over. And I'm happy to say it is done for now anyway. I have a couple of things I would like to upgrade or improve but will not be tackling it anytime soon. So here are the before and afters. Changes included - flooring - paint - area carpets - bedding, bed and night tables - window treatments.


Monday, February 23, 2015

Making Less Than Perfect Beef Cuts Yummy!

I don't know about you, but I'm not the worlds worst cook and I'm not the best. I married young and have been acquiring this skill when the responsibility was plunked on my lap 20 years ago. And honestly the learning curve just keeps going and going. Especially since we turned gluten free and as low carb as possible. This past week I researched and found two great recipes for cooking up those cuts of beef that are not so easy to cook. This week it was stewing beef and a blade steak and I learned some valuable information that I want to pass on and that I know will serve me well probably for the rest of my life.

I'm a pretty good soup maker. I have a couple of stand by soups that I basically made myself and perfected over the years. But beef soup was never one that I had attempted. But I found this hearty recipe that takes those stewing beef cuts and makes them tender and yummy. In this recipe it calls for dusting of the beef cuts with flour. For this I just used a gluten free version.

http://www.theslowroasteditalian.com/2014/09/hearty-beef-soup-recipe.html

The second excellent recipe I came across was for blade steak. They seem to be the last cuts left in the freezer from our CSA (community supported agriculture) purchase and honestly I had no idea how to cut this. So after some research this is a passed the test recipe sure to make your beef yummy fall off the bone.

How to Cook a Blade Steak | LIVESTRONG.COM

I encourage you to check these out! They certainly passed the test in our home.


Thursday, February 19, 2015

Canvas Floor Mats

So I had bought these cushy, soft and EXPENSIVE floor mats from bed bath and beyond. They weren't in use for more than a day before I understood a major problem with them. They attract dirt like crazy. And that dirt sticks, like micro fiber clothes. Completely bummed with my failed purchase at this point, I again begin to brainstorm. How can I possibly salvage the situation. So after looking at the construction of the mats...they have a rubber under coating, cloth topped and edged with a binding sewn through all the layers. So I decide that I can get canvas material from the fabric store and new binding and makeover these mats into a stain resistent and easily clean funky mats.

Here are the original mats.
after ripping of the binding, I cut the fabric to size and and spray glue the new fabric in place
carefully sewing both the front and the back of the binding. This was a slow process but well worth it. And the rubber backing was making it difficult to maneuver but with patience I made it work.
 
Loving my new mats.


Thursday, February 12, 2015

How to Fix Ripped Drywall

I am currently cleaning and reorganizning my office AGAIN...and after removing a storage container that I had stuck to the wall I ripped a decent chunk of dry wall. I knew I could fix this as I had done some repairs around the house earlier but it wasn't until then that I finally figured out how to fix these issues properly. So I'm passing along my info to you.

Drywall tears don't fix the same as normal dents or holes but it is really very simple.

This is what you will need.

 
I'm all about convenience so for almost all wall repair I use poly fill in a tube, yes premixed and easy to use but for drywall rips you definitely need a compound that you mix yourself. The consistency is much finer and will clean the fine details of the rip that you need to hide under paint.
 
Next you will need a decently large putty knife blade. The longer the better.
 
Here is the rip I was repairing. Ist remove all the loose bits. You don't want anything that can flap or move left on the wall. Sometimes this means making the rip bigger. If its getting out of control use an sharp knife or blade to put a cut in the wall where the rip is heading. A blunt cut will still be better to repair than a very long tear.
Next you will need a temporary small container for mixing the dry wall compound with water. Add enough water to make a consistency that is not runny but not thick like peanut butter. It needs to be easy to manuveur.
put a decent amount along the top edge of your blade and turn the blade to face the wall with the putty side towards your tear. On an angle smooth over the surface until you get a clean thin cover over the whole tear. Try not to muck with it to much at the drywall is susceptible to the moisture. On or two quick runs over and leave it to dry. It drys quick. After its dry run a slightly damp spong over the surface or give it a very quick sanding. If its not smooth to the touch repeat the putty steps. After it is dry its ready for paint.


Wednesday, January 28, 2015

Organizing a Small Laundry Room

We have a rather small, not the smallest, but small none the less, laundry room and we have 6 occupants using it. There is nothing I hate more than clutter, but clutter in a small space is a nightmare for me, and on top of that I have to do the chore of laundry in this space. It hasn't been great these last several years, so much so that I have been folding on my bed.

I think I finally got this figured out!

Here's the space I'm talking about.


After thinking and brainstorming a long time about this I asked myself what do I hate most about my laundry room. It's stuff! Stuff on the counter, stuff on the floor, no work space. So I figured my objective is to get stuff off the counter and off the floor FOR GOOD! And make it comfortable to work in there.

I don't know about your house, but in mine clothes gets collected from everywhere. I can't tell you how many stray socks I collect from our basement every week. Then sweaters or t shirts that get left lying around. So for me step one was to make it organized to accept these items without compromising floor space.


I added 3 matching hampers to accept floater items at any time. One for dark, lights, and whites. I gave a lesson to my kids and husband :) that clothes on the floor is no longer an option. And when they do a dark load they can fill it in with whatever is collected in the dark bin etc.

The other issue was not having a clean workspace for folding closes. This is caused by the above articles and stray socks (ugh) that get washed with someone else's load but never seem to find it back to their closet. And calling that person to get their clothes is not really reasonable since at any given time they aren't even home. So I knew I needed better organized storage for that. So I installed one more shelf, so that I could put 6 generous baskets within reach for each person in our house. Their items can go into their basket when cleaned and they can empty it all when its full or when they do their own laundry. Yes all my kids do their own laundry but I take pity and help the boys fold. YES I LABEL STUFF This makes it easier to make everyone accountable.


Lastly I wanted hand towels, dish towels to have a quick and easy spot to be stored so I hung the undercounted baskets (in First photo above) to the underneath side of the counter. I actually had these laying around and all it took was some small hooks turned into the underneath side of the counter. Then I labeled them too so that other people in the house can help keep things organized instead of trying to read my mind where things should go :)


Recommended Blog

A girlfriend of mine has this great blog where she discusses tons of great ideas and tidbits of info from parenting to organizing and life as a sailers wife. Check it out! Here's the link!